Insulation

Spray Foam Insulation Guide: Improving Energy Efficiency and Comfort in Your Home

Insulation

Walk into a home that stays comfortable all year long and you may not immediately notice what makes the difference. The temperature feels stable, the air seems cleaner, and heating or cooling systems do not struggle to keep up with the weather outside. One of the hidden factors that can create this kind of comfort is proper insulation.

Among modern insulation options, spray foam insulation has become a popular solution for improving energy efficiency and sealing homes against unwanted air movement. Understanding how spray foam insulation works can help homeowners make informed decisions about improving comfort, reducing energy costs, and protecting their homes. Contact Ultimate Radiant Barrier for more information.

Understanding Spray Foam Insulation

Spray foam insulation is a type of insulation material that is applied as a liquid and expands into foam after it is sprayed onto a surface. As the material expands, it fills gaps, cracks, and cavities within walls, ceilings, and other structural spaces.

The expansion process allows the foam to create an airtight barrier that reduces the movement of air between indoor and outdoor environments. This barrier helps maintain indoor temperatures more effectively.

Spray foam insulation differs from traditional insulation materials such as fiberglass or cellulose. While those materials primarily slow down heat transfer, spray foam also helps seal small openings that allow air to leak through the building structure.

Because the foam expands to fill irregular spaces, it can reach areas that are difficult to insulate using traditional materials. This feature makes spray foam especially useful in spaces with unusual shapes or tight corners.

By combining insulation with air sealing, spray foam helps improve the overall efficiency of a building.

Types of Spray Foam Insulation

Spray foam insulation is generally divided into two main categories. These types differ in density, flexibility, and how they perform in different parts of a building.

Open cell spray foam is lighter and softer than other forms of foam insulation. When applied, it expands significantly and creates a flexible structure that can absorb sound and help reduce noise transmission.

This type of foam is often used inside walls, ceilings, and interior spaces where flexibility and sound reduction are beneficial. Its lighter structure allows it to fill large cavities easily.

Closed cell spray foam has a denser structure and provides a stronger barrier against air and moisture. Because of its compact composition, it also adds structural strength to certain building components.

Closed cell foam is often used in areas where moisture resistance and durability are especially important, such as exterior walls, crawl spaces, and roofing systems.

Both types of spray foam insulation provide effective thermal resistance and air sealing, though each is suited for different applications.

How Spray Foam Insulation Improves Energy Efficiency

Energy efficiency is one of the primary reasons homeowners consider spray foam insulation. Heating and cooling systems must work harder when conditioned air escapes through gaps in walls, ceilings, or foundations.

Spray foam insulation helps reduce this problem by sealing air leaks throughout the building structure. When the foam expands into cracks and gaps, it blocks pathways where air might otherwise escape.

This airtight barrier allows heating and cooling systems to maintain indoor temperatures more easily. As a result, less energy is required to keep the home comfortable.

Improved insulation also reduces temperature fluctuations between rooms. Homes with effective insulation often feel more consistent and balanced in temperature.

By reducing the workload on heating and cooling systems, spray foam insulation can contribute to lower energy consumption and improved efficiency.

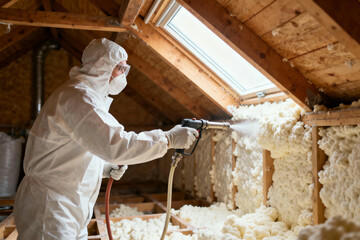
The Spray Foam Installation Process

Installing spray foam insulation involves several steps designed to ensure proper coverage and performance. The process begins with an inspection of the areas that require insulation.

Before application, surfaces are prepared to ensure the foam adheres properly. Any debris or dust that could interfere with adhesion may be removed.

During installation, specialized equipment mixes the foam components and sprays them onto the desired surface. As the material is applied, it expands rapidly to fill the surrounding space.

The expansion process allows the foam to conform to the shape of the cavity, creating a tight seal against air infiltration. Installers monitor the thickness and coverage to ensure the insulation performs as intended.

After application, the foam is allowed to cure and harden. Once cured, the material becomes a stable layer of insulation that remains in place for many years.

Proper installation ensures that the insulation delivers the full benefits of thermal protection and air sealing.

Benefits of Spray Foam Insulation for Home Comfort

Spray foam insulation offers several advantages that extend beyond energy efficiency. One of the most noticeable benefits is improved indoor comfort.

Because spray foam reduces drafts and air leaks, indoor temperatures remain more stable throughout the home. Rooms that previously felt colder or warmer than others may become more balanced.

The airtight seal created by spray foam also helps prevent outdoor pollutants from entering the home. Dust, pollen, and other airborne particles have fewer pathways to move indoors.

Moisture control is another important benefit. In certain applications, spray foam can help reduce the amount of moisture that enters wall cavities or attic spaces. This can contribute to a healthier indoor environment.

Spray foam insulation also helps reduce outside noise. The foam structure absorbs sound and limits the movement of noise through walls and ceilings.

These combined benefits make spray foam insulation an attractive option for homeowners seeking both comfort and efficiency.

Long Term Durability of Spray Foam Insulation

Another advantage of spray foam insulation is its durability. Once the foam has cured and hardened, it remains stable and does not settle or shift over time.

Traditional insulation materials may compress or sag, which can reduce their effectiveness. Spray foam maintains its shape and continues to seal air gaps throughout the life of the building.

Because it adheres directly to surfaces, spray foam also resists movement caused by temperature changes or structural vibrations.

In addition to maintaining insulation performance, spray foam can contribute to the structural strength of certain building components when used in specific applications.

The long lifespan of spray foam insulation means that homeowners often benefit from its performance for many years without needing replacement.

Areas of the Home Where Spray Foam Is Commonly Used

Spray foam insulation can be applied in several areas throughout a home to improve thermal performance and air sealing. One of the most common locations is the attic.

Attics are often responsible for significant energy loss because warm air rises and escapes through the roof structure. Applying spray foam in this area helps create an effective barrier.

Walls are another common location for spray foam insulation. Filling wall cavities with foam helps prevent air movement and improves indoor temperature stability.

Crawl spaces and basements may also benefit from spray foam installation. These areas can allow moisture and outside air to enter the home if they are not properly sealed.

Roofing systems sometimes use spray foam insulation as well. In these cases the foam helps protect the structure while providing insulation and air sealing.

By applying spray foam in strategic locations, homeowners can improve energy performance throughout the entire home.

Conclusion: Why Spray Foam Insulation Is a Smart Home Improvement

Spray foam insulation has become one of the most effective solutions for improving energy efficiency and comfort in modern homes. By expanding to fill gaps and creating an airtight barrier, it addresses one of the most common causes of energy loss.

This insulation method not only helps reduce heating and cooling costs but also enhances indoor comfort by stabilizing temperatures and limiting drafts. Its ability to control moisture and reduce noise adds further benefits that contribute to a healthier living environment.

Because spray foam insulation remains durable and effective for many years, it represents a long term investment in the performance of a home. For homeowners seeking improved efficiency, comfort, and protection, spray foam insulation offers a reliable and modern solution.

Metal Craft

Architecture Stairway Metal Railing: Design, Safety, and Modern Aesthetic Benefits

Metal Railing

A staircase often becomes one of the most noticeable architectural features in a home or building. It connects levels, guides movement, and shapes how people experience the interior space. While many people focus on the steps themselves, another important element plays a major role in both safety and design. The railing that runs alongside the staircase can transform the entire appearance of the structure.

Metal railings have become a popular choice in modern architectural design because they combine strength, durability, and visual appeal. From sleek contemporary interiors to industrial-inspired spaces, metal stairway railings create a balance between function and style. Their clean lines and structural stability make them suitable for both residential and commercial environments. Understanding the role of Architecture Stairway Metal Railing highlights why it has become an important feature in modern building design. From enhancing safety to elevating the visual character of a staircase, metal railings offer practical and aesthetic advantages that contribute to a well designed space.

The Role of Stairway Railings in Architecture

Stairway railings are an essential safety component of any staircase. Their primary purpose is to provide support and stability for individuals as they move up or down the stairs. Without a railing, a staircase becomes significantly more dangerous, especially in high traffic areas or in homes with children and elderly occupants.

In addition to safety, railings also define the architectural boundaries of the staircase. They create a clear visual edge that separates the stairway from surrounding areas. This structural definition helps guide movement and improves the overall flow of the space.

Architectural railings also contribute to the visual identity of the staircase. The design, material, and shape of the railing can dramatically influence how the staircase integrates with the rest of the building’s design. A carefully designed railing can turn an ordinary staircase into a striking architectural feature.

Metal railings have gained popularity because they provide both structural reliability and design flexibility. They allow architects and designers to create staircases that are not only safe but also visually impressive.

Why Metal Is a Popular Choice for Stairway Railings

Metal has become one of the most widely used materials for stairway railings due to its strength and versatility. Unlike some materials that may weaken or deteriorate over time, metal railings maintain their structural integrity even under heavy use.

Durability is one of the key reasons metal railings are favored in architectural design. Metal can withstand daily wear, environmental exposure, and changes in temperature without losing its shape or stability.

Another advantage of metal railings is their adaptability to different design styles. They can be crafted into sleek modern forms, decorative patterns, or minimalist structures depending on the architectural vision.

Metal railings also allow for thinner structural elements while still providing strong support. This ability makes them ideal for open concept designs where maintaining visual openness is important.

Because of these qualities, metal railings are commonly used in both residential staircases and large commercial buildings.

Common Types of Metal Used in Stairway Railings

Several types of metal are commonly used in stairway railing construction. Each material offers unique properties that influence both the appearance and performance of the railing.

Steel is one of the most widely used metals for stairway railings. It provides exceptional strength and durability, making it suitable for heavy traffic environments. Steel railings can be finished in various ways to achieve different visual styles.

Stainless steel is another popular option known for its sleek appearance and resistance to corrosion. Its clean and polished surface often complements contemporary architectural designs.

Aluminum railings are valued for their lightweight properties and resistance to rust. This makes aluminum a practical option for both interior and exterior staircases.

Wrought iron is often used when decorative or ornamental railing designs are desired. This material allows intricate patterns and artistic shapes to be incorporated into the railing structure.

The choice of metal depends on the desired aesthetic, the environment where the railing will be installed, and the overall design concept of the building.

Design Styles for Metal Stairway Railings

Metal stairway railings can be designed in a wide range of styles that complement different architectural themes. In modern homes, minimalist metal railings are often chosen for their clean lines and understated elegance.

These designs frequently feature simple vertical bars or horizontal rods that maintain an open visual flow. The result is a staircase that feels light and contemporary.

Industrial style railings are another popular design option. These railings often incorporate exposed metal structures with darker finishes that emphasize raw materials and structural elements.

For more traditional or decorative spaces, ornate metal railings can be crafted with intricate patterns and curved shapes. These designs add a sense of artistry and craftsmanship to the staircase.

Combining metal railings with other materials such as wood or glass can also create striking architectural contrasts. For example, a wooden handrail paired with metal balusters blends warmth with strength, while glass panels framed by metal railings provide transparency and modern sophistication.

These design possibilities allow metal stairway railings to adapt to many different architectural environments.

Safety and Structural Benefits of Metal Railings

Beyond aesthetics, metal stairway railings offer significant safety advantages. The strength of metal allows railings to withstand pressure and provide reliable support for individuals using the staircase.

Well designed railings help prevent falls by creating a stable barrier along the edges of the stairs. Handrails provide an additional point of contact that helps users maintain balance while moving between levels.

Metal railings are also capable of meeting strict safety requirements in both residential and commercial construction. Their structural properties make them suitable for installations where safety regulations require strong and dependable materials.

Another benefit is the long term reliability of metal. Unlike some materials that may warp or crack over time, metal railings retain their structural stability for many years with proper maintenance.

These qualities make metal railings an important safety feature in modern architectural design.

Maintenance and Longevity of Metal Stairway Railings

One of the advantages of metal railings is their relatively low maintenance requirements. Most metal surfaces can be kept clean through regular wiping or occasional washing.

Protective coatings and finishes are often applied to metal railings to enhance their durability. These finishes help prevent corrosion, scratches, and other forms of wear that may occur over time.

Stainless steel and aluminum railings are particularly resistant to rust and environmental damage, making them suitable for outdoor staircases as well as interior spaces.

Periodic inspection helps ensure that railings remain secure and free from damage. Tightening loose fasteners or addressing minor surface wear helps maintain both the safety and appearance of the railing.

With proper care, metal stairway railings can last for decades while maintaining their structural integrity and visual appeal.

The Architectural Impact of Stairway Metal Railings

In many buildings the staircase acts as a central visual feature that connects different areas of the interior. The design of the railing can significantly influence how the staircase contributes to the overall architectural character of the space.

Metal railings provide a balance between strength and visual elegance. Their ability to form clean lines and open structures allows designers to create staircases that feel spacious and modern.

The contrast between metal railings and surrounding materials such as wood, stone, or glass can create striking visual compositions. These contrasts draw attention to the staircase as a design centerpiece.

By combining safety, durability, and style, metal railings enhance both the function and aesthetic value of architectural stairways.

Conclusion

Architecture stairway metal railings play an important role in shaping both the safety and visual impact of a staircase. Their strength provides reliable support for everyday use, while their design flexibility allows them to complement a wide range of architectural styles.

From sleek modern interiors to decorative traditional spaces, metal railings offer durability and elegance that elevate the overall design of a staircase. Their ability to combine structural performance with artistic expression makes them a valuable element in architectural planning.

By choosing thoughtfully designed metal railings, architects and homeowners can transform a staircase into a striking feature that enhances both safety and aesthetic appeal within a building.

Cabinet Refinishing

Understanding the Cabinet Refinishing Process for Different Wood Types

Cabinet Refinishing Sacramento

Cabinet refacing is an excellent alternative to replacing cabinets because it’s quick, affordable, and offers a timeless harmony of beauty and functionality. The type of wood used in your existing face frames determines how well they will respond to staining and painting. Oak, birch, and cherry are ideal for refinishing, as they absorb stains evenly. However, softer woods like pine may absorb stains unevenly or not at all.

Pine

Cabinet Refinishing Sacramento is a great way to transform your kitchen. While hickory, maple, and walnut offer the best balance of durability and beauty, pine, birch, and other affordable options also offer a beautiful new look for your cabinets. However, all woods respond differently to sanding and staining, so some might require more extensive preparation than others. To avoid costly mistakes, it’s important to understand the cabinet refinishing process for different wood types before starting your project.

Pine is easy to work with and durable enough for a variety of projects. It is also very inexpensive and readily available. However, it is prone to blotching and needs extra attention when it comes to staining. To prevent blotching, apply a wood conditioner to the surface before applying any stain. This will help even out the absorption of the stain and help reduce the appearance of grain lines.

Once the wood is conditioned, it’s time to start staining. Make sure you have a well-ventilated work area as this step can produce harmful fumes. Use a brush to apply the stain to the wood, working in manageable sections. Be sure to blend each section into the next to avoid overlapping areas. Allow the stain to dry for 24 hours before sanding and adding another coat.

Once the stain is dry, reattach any hardware and close the doors. Then apply a protective sealant to the cabinets. This will protect your new finish and add a nice sheen to your cabinets. Let the sealant dry according to the manufacturer’s instructions. Finally, wipe down the cabinets with a damp cloth to remove any dust or residue that may have developed. Then it’s time to enjoy your new kitchen!

Birch

Birch is a common choice for cabinetry because it’s a beautiful wood with a subtle grain. It’s also a very durable material and can be used in a variety of projects. It’s important to protect your birch cabinets properly with the right finish so that they stand up to years of wear and tear. The most popular option for birch is a clear water-based polyurethane, which can be sprayed, brushed, or rolled on. It’s a more cost-effective alternative to stain and it protects the surface of the wood from dirt and other debris.

Depending on your preferences, you can also stain birch cabinets. However, it’s best to sand the surfaces lightly before starting, as the wood can easily absorb the stain unevenly. Then, apply a pre-stain conditioner and use a gel stain to prevent streaking. You can also choose to stain birch with a natural color or select a darker tint, although it’s best to test the finish on a piece of scrap plywood to see how long it takes for the finish to dry and what the final product looks like.

When it comes to painting, birch is an excellent choice because of its durability and even finish. It’s easier to prep than other wood types, but it’s still important to follow the proper steps to ensure a quality finish. You can also try a color wash technique to add depth and bring out the natural beauty of the wood.

Refinishing your cabinets is one of the most cost-effective and impactful ways to transform a kitchen. But it’s important to choose the right wood for your project, as some woods respond differently to sanding and staining. Work with the professionals at N-Hance of Wooster to achieve a beautiful result for your home.

Cherry

Cherry wood is a gorgeous choice for cabinets and is often in good shape. But like many other softwoods, it can be a bit tricky to work with when it comes to staining or painting. A few key tips can make your next cabinet refinishing project a success.

Cherry’s white sapwood and rosy-tan heartwood become more distinct over time, making them harder to blend with other colors. To avoid this problem, refinish with an oil finish that allows you to add color gradually by wiping the surface. Tung or boiled linseed oil soak into the smallest pores, giving the wood a deep amber tone that can enhance the beauty of the grain. However, these finishes can also highlight the differences between the two colors and cause parts of the boards to look darker than others. This mottled appearance can be a feature that some people enjoy, but it’s not to everyone’s liking. To minimize it, warm the oil finish in hot water before applying and wipe the surface.

If you’re not comfortable using an oil-based finish, consider a wipe-on product (see Sources). These sprays are easy to apply and can help prevent drips or sags. Just be sure to follow the manufacturer’s application instructions and wear gloves and a respirator when working with these chemicals.

Alternatively, you can use an alkyd enamel or latex enamel. Both of these options offer quick drying times, but the enamel will yellow with age and can be difficult to match in the future. If you do choose an oil-based paint, be sure to topcoat with a high-performance polyurethane to increase durability and maintain the beauty of your cherry cabinets.

Maple

Maple wood cabinets are beautiful, and they are often preferred by homeowners who want a sleek, modern look in their kitchens. However, staining maple can be tricky because it is a tight-grained wood. Tight-grained woods tend to absorb stain unevenly and can produce blotchy results. This is not a reflection of the homeowner’s skills, but simply because maple and other tight-grained woods have natural density variations.

To achieve an even stain, it is important to properly prepare the wood by sanding with a very fine grit. This process helps to open the pores of the wood and help to improve absorption. To avoid a blotchy finish, it is also recommended to use a pre-stain wood treatment or sealer. These products will limit stain penetration, which helps to prevent blotching on the less dense areas of the cabinet doors.

The end grain of maple wood also tends to soak in color at a faster rate than the rest of the wood, so it is important to seal it with glue to minimize stain absorption and achieve an even result. Lastly, a gel stain is often recommended for maple because pigment stains are often unable to penetrate the tight-grained wood or sink in evenly, resulting in blotchy results.

Although it can be difficult to achieve an even stain on tight-grained woods like maple and walnut, with proper preparation, the results can be well worth it. Staining allows homeowners to highlight their favorite features of the wood and protect them from daily wear and tear. If you are not confident in your ability to stain maple cabinets, consider working with a professional refinishing company to ensure that your cabinets look their best.

Hardwoods

Natural wood is a beautiful material for cabinetry, adding texture and character to any kitchen. It’s also durable, withstanding years of wear and tear with little deterioration. But when your cabinets begin to show signs of wear, refinishing them is an easy way to restore their original beauty. This process removes the old finish and gives your cabinetry a fresh new look, at a fraction of the cost of replacing them.

Like all wood projects, the most important step in refinishing is wood preparation. This involves removing indentations, grease and oil with multiple grits of sandpaper and scraping, along with sponging and sanding again. This is necessary to ensure that the stain or finish can be taken into the pores evenly.

Some woods have tight grain structures that don’t require grain filler, while others such as oak and mahogany have open grain structures that must be filled for a smooth finish. Once the wood has been sanded, it’s time to apply a primer. A high-quality oil-based primer will provide a good base for the topcoat and improve adhesion. A stain-blocking primer is optional, but will seal knots and other surface defects that may bleed through the topcoat.

Then, it’s time to stain. If you’re using a water-based stain, follow the manufacturer’s instructions to avoid raising the grain of the wood. This occurs when the water in a finish is absorbed by the wood, which swells the fibers and produces “whiskers.” To reduce this effect, wet the bare wood with a damp cloth before applying your stain or clear coat. Then, sand off the raised fibers with fine garnet sandpaper to produce a smooth, even finish.