Cabinet refacing is an excellent alternative to replacing cabinets because it’s quick, affordable, and offers a timeless harmony of beauty and functionality. The type of wood used in your existing face frames determines how well they will respond to staining and painting. Oak, birch, and cherry are ideal for refinishing, as they absorb stains evenly. However, softer woods like pine may absorb stains unevenly or not at all.
Pine
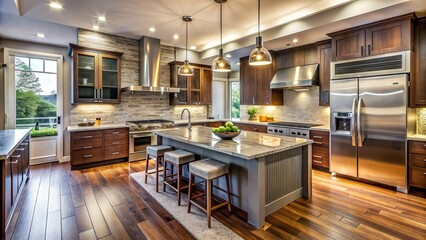
Cabinet Refinishing Sacramento is a great way to transform your kitchen. While hickory, maple, and walnut offer the best balance of durability and beauty, pine, birch, and other affordable options also offer a beautiful new look for your cabinets. However, all woods respond differently to sanding and staining, so some might require more extensive preparation than others. To avoid costly mistakes, it’s important to understand the cabinet refinishing process for different wood types before starting your project.
Pine is easy to work with and durable enough for a variety of projects. It is also very inexpensive and readily available. However, it is prone to blotching and needs extra attention when it comes to staining. To prevent blotching, apply a wood conditioner to the surface before applying any stain. This will help even out the absorption of the stain and help reduce the appearance of grain lines.
Once the wood is conditioned, it’s time to start staining. Make sure you have a well-ventilated work area as this step can produce harmful fumes. Use a brush to apply the stain to the wood, working in manageable sections. Be sure to blend each section into the next to avoid overlapping areas. Allow the stain to dry for 24 hours before sanding and adding another coat.
Once the stain is dry, reattach any hardware and close the doors. Then apply a protective sealant to the cabinets. This will protect your new finish and add a nice sheen to your cabinets. Let the sealant dry according to the manufacturer’s instructions. Finally, wipe down the cabinets with a damp cloth to remove any dust or residue that may have developed. Then it’s time to enjoy your new kitchen!
Birch
Birch is a common choice for cabinetry because it’s a beautiful wood with a subtle grain. It’s also a very durable material and can be used in a variety of projects. It’s important to protect your birch cabinets properly with the right finish so that they stand up to years of wear and tear. The most popular option for birch is a clear water-based polyurethane, which can be sprayed, brushed, or rolled on. It’s a more cost-effective alternative to stain and it protects the surface of the wood from dirt and other debris.
Depending on your preferences, you can also stain birch cabinets. However, it’s best to sand the surfaces lightly before starting, as the wood can easily absorb the stain unevenly. Then, apply a pre-stain conditioner and use a gel stain to prevent streaking. You can also choose to stain birch with a natural color or select a darker tint, although it’s best to test the finish on a piece of scrap plywood to see how long it takes for the finish to dry and what the final product looks like.
When it comes to painting, birch is an excellent choice because of its durability and even finish. It’s easier to prep than other wood types, but it’s still important to follow the proper steps to ensure a quality finish. You can also try a color wash technique to add depth and bring out the natural beauty of the wood.
Refinishing your cabinets is one of the most cost-effective and impactful ways to transform a kitchen. But it’s important to choose the right wood for your project, as some woods respond differently to sanding and staining. Work with the professionals at N-Hance of Wooster to achieve a beautiful result for your home.
Cherry
Cherry wood is a gorgeous choice for cabinets and is often in good shape. But like many other softwoods, it can be a bit tricky to work with when it comes to staining or painting. A few key tips can make your next cabinet refinishing project a success.
Cherry’s white sapwood and rosy-tan heartwood become more distinct over time, making them harder to blend with other colors. To avoid this problem, refinish with an oil finish that allows you to add color gradually by wiping the surface. Tung or boiled linseed oil soak into the smallest pores, giving the wood a deep amber tone that can enhance the beauty of the grain. However, these finishes can also highlight the differences between the two colors and cause parts of the boards to look darker than others. This mottled appearance can be a feature that some people enjoy, but it’s not to everyone’s liking. To minimize it, warm the oil finish in hot water before applying and wipe the surface.
If you’re not comfortable using an oil-based finish, consider a wipe-on product (see Sources). These sprays are easy to apply and can help prevent drips or sags. Just be sure to follow the manufacturer’s application instructions and wear gloves and a respirator when working with these chemicals.
Alternatively, you can use an alkyd enamel or latex enamel. Both of these options offer quick drying times, but the enamel will yellow with age and can be difficult to match in the future. If you do choose an oil-based paint, be sure to topcoat with a high-performance polyurethane to increase durability and maintain the beauty of your cherry cabinets.
Maple
Maple wood cabinets are beautiful, and they are often preferred by homeowners who want a sleek, modern look in their kitchens. However, staining maple can be tricky because it is a tight-grained wood. Tight-grained woods tend to absorb stain unevenly and can produce blotchy results. This is not a reflection of the homeowner’s skills, but simply because maple and other tight-grained woods have natural density variations.
To achieve an even stain, it is important to properly prepare the wood by sanding with a very fine grit. This process helps to open the pores of the wood and help to improve absorption. To avoid a blotchy finish, it is also recommended to use a pre-stain wood treatment or sealer. These products will limit stain penetration, which helps to prevent blotching on the less dense areas of the cabinet doors.
The end grain of maple wood also tends to soak in color at a faster rate than the rest of the wood, so it is important to seal it with glue to minimize stain absorption and achieve an even result. Lastly, a gel stain is often recommended for maple because pigment stains are often unable to penetrate the tight-grained wood or sink in evenly, resulting in blotchy results.
Although it can be difficult to achieve an even stain on tight-grained woods like maple and walnut, with proper preparation, the results can be well worth it. Staining allows homeowners to highlight their favorite features of the wood and protect them from daily wear and tear. If you are not confident in your ability to stain maple cabinets, consider working with a professional refinishing company to ensure that your cabinets look their best.
Hardwoods
Natural wood is a beautiful material for cabinetry, adding texture and character to any kitchen. It’s also durable, withstanding years of wear and tear with little deterioration. But when your cabinets begin to show signs of wear, refinishing them is an easy way to restore their original beauty. This process removes the old finish and gives your cabinetry a fresh new look, at a fraction of the cost of replacing them.
Like all wood projects, the most important step in refinishing is wood preparation. This involves removing indentations, grease and oil with multiple grits of sandpaper and scraping, along with sponging and sanding again. This is necessary to ensure that the stain or finish can be taken into the pores evenly.
Some woods have tight grain structures that don’t require grain filler, while others such as oak and mahogany have open grain structures that must be filled for a smooth finish. Once the wood has been sanded, it’s time to apply a primer. A high-quality oil-based primer will provide a good base for the topcoat and improve adhesion. A stain-blocking primer is optional, but will seal knots and other surface defects that may bleed through the topcoat.
Then, it’s time to stain. If you’re using a water-based stain, follow the manufacturer’s instructions to avoid raising the grain of the wood. This occurs when the water in a finish is absorbed by the wood, which swells the fibers and produces “whiskers.” To reduce this effect, wet the bare wood with a damp cloth before applying your stain or clear coat. Then, sand off the raised fibers with fine garnet sandpaper to produce a smooth, even finish.