Cleaning Services

How to Find the Best Tile and Grout Cleaning Services

Keeping tile and grout clean is key to maintaining the appearance and healthfulness of your home. Whether you have hard-to-reach spots or stubborn stains, there are several cleaning solutions to help.

Some involve ingredients found in your kitchen pantry. For example, Perry recommends a DIY grout cleaner made with baking soda and hydrogen peroxide. Contact Tile And Grout Cleaning El Dorado Hills CA now!

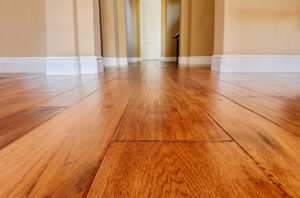
Tile is a beautiful flooring material that adds a clean, stylish look to any home. Its main setback is that it can be difficult to maintain and clean, especially the grout. Regular cleanings can prevent mold and mildew from growing, and keep your floors looking their best. This is why it is important to hire a professional tile and grout cleaner for your cleaning needs.

Before hiring a professional to do your tile and grout cleaning, ask them questions about their experience and methods. You want to find a company that has a history of providing high-quality service and results. It is also important to ask about the types of products they use and what repercussions those chemicals may have on your tile and grout.

It is recommended to get your tile and grout cleaned professionally every 2-3 years. The grout is porous, and it easily collects dirt and germs over time. This can cause a bad smell and lead to the growth of mold and mildew, which can affect your family’s health.

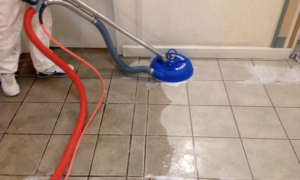
Professional cleaners will have all the tools necessary to clean your tile and grout. They will be able to remove tough stains without damaging the tiles. They also have the knowledge to use different cleaners on different types of tile, so they can avoid using acids or other harsh chemicals that can damage the surface of your tile.

Before a cleaning crew arrives, they will need to move any furniture from the area that is being cleaned. They will also need to remove any rugs, mats, plants, or trash cans that are in the area. This is to ensure that the cleaning process does not disturb any other areas of your home.

When hiring a professional, they will typically sweep the floor before starting. They will then use a special machine to clean the tile and grout. Then, they will use a grout sealing product to protect the newly cleaned tile. This will help extend the life of your tile and grout while preventing future staining. In addition, it will give your home a fresh, spring-like scent that is sure to impress your guests.

Inquire About Their Methods

Tile and grout add style and elegance to your home, but they also gather dirt that deteriorates their beauty over time. Regularly cleaning these surfaces can help prevent build-up, but sometimes scrubbing isn’t enough to eliminate tough stains and spillage marks. When this occurs, you need professional cleaning services that have the tools and cleaners to remove stubborn debris.

When hiring a company to clean your tile and grout, ask them what process they use. They should be able to provide you with a detailed explanation of how they will wash your surfaces so that you can trust their work. This may include starting with an initial inspection to identify troublesome spots and note any areas that need special attention.

They should be able to tell you whether they will use an oxygen bleach powder or another type of cleaner that is safe for your surfaces. Bleach is a common household product that can be used to lighten dark colors, but it is also highly corrosive and can damage grout over time if it comes into contact with it too often. Oxygen bleach powder works similarly to chlorine, but it doesn’t produce noxious fumes or harm surfaces when applied properly.

Another option is to use a steam cleaner that’s compatible with your tile surface. Steamers can make quick work of dirty tile and grout, but it’s important to follow the manufacturer’s directions carefully to avoid overusing the wand or allowing it to remain in contact with your tiles for too long.

In addition to being a great way to keep your home looking its best, cleaning tile and grout regularly helps obstruct the accumulation of bacteria and germs that could damage your health. Dirty tile and grout lines can be breeding grounds for fungus, mold, and other harmful organisms that are linked to chronic illnesses. Hiring a professional who can professionally clean your tile and grout will reduce the amount of bacteria in your home and keep your tiles looking their best. They can also give you helpful tips on how to keep your tile and grout clean between professional cleaning visits.

Ask for References or Reviews

Choosing the right tile cleaning company is crucial to ensure that you get the best possible results. A good way to find out whether or not a company is right for you is to ask for references or reviews from past clients. This will give you a firsthand look at the quality of their work and customer service.

It is also important to find out what type of products they will use in your home. Some cleaners may be using unsafe or toxic chemicals that could damage your tiles and grout. Ask the cleaning company about the types of cleaners they use and be sure to read any online reviews or testimonials.

A thorough clean of your tile and grout can make a huge difference in the appearance of your floors. It can help to reduce the amount of dirt, grime, and bacteria that build up on your tiles over time. This can improve the overall look of your home, as well as helping to prevent potential health problems for you and your family.

While it is possible to do tile and grout cleaning on your own, a professional will have the equipment and experience needed to get the job done quickly and efficiently. They will know how to tackle even the most stubborn stains without damaging your tiles, and they can reach those hard-to-reach places that are often missed during regular household cleaning.

Before hiring a tile and grout cleaning company, be sure to ask for referrals from friends or family members who have used the services before. This is one of the best ways to find a reliable and experienced cleaner that you can trust with your home. Also, be sure to ask about any pricing details and if there are any hidden fees or charges that you should be aware of. Finally, it is important to check the cleaning company’s license and insurance policy before hiring them to do any work at your home. This will ensure that they are insured in case of any accidents or damages during the cleaning process.

Get an Estimate

Tile and grout are a lot harder to clean than most people think, especially since dirt and grime get ground in. A professional cleaner will use a combination of hot water, high pressure rinsing and an abrasive cleaning solution to get the job done right. Your quote will depend on how soiled the tile is and how long it has been since it was last cleaned. It will also depend on the size of your tiles and how many grout lines there are. The more grout lines, the longer it will take to clean them all.

Grout is a mixture of cement, sand and water that fills the space between your tile pieces when they are installed. It is porous and easily absorbs grease, mildew, dirt and spills. This can cause your tile to become dull and discolored. Professional cleaning services use specialized tools to get deep into grout crevices, where dirt and mold can hide. They can also help you keep your grout looking new by applying a sealant after they are finished.

When getting a quote for tile and grout cleaning, make sure you understand how the pricing structure works. Some professionals offer flat fees, while others base their prices on square footage. Some may also charge extra for additional services like hand cleaning or spot cleaning. Some include basic grout color-sealing in their cleaning, while others will charge an additional fee for this service.

If you want your grout to stay as clean as possible, it’s a good idea to vacuum and sweep regularly. Also, be sure to ventilate well during the cleaning process to avoid humidity-induced microbial growth in your grout lines.

Once your grout and tile are clean, it’s important to follow any instructions from the cleaner about how to care for them. For example, you should stay off freshly-cleaned floors for 30 minutes and be careful about returning furniture (with felt pads or rugs) until the floor has completely dried. You should also avoid getting any liquid on the tile or grout for 24 hours afterward.

Hardwood Floor Services

Transforming Spaces: Hardwood Floor Revival Techniques

Hardwood floors are renowned for their durability, but even the toughest of them need a little love occasionally. Regular use wears down the top layer of the wood, causing scratches and other damage that can be repaired by refinishing the floor.

Hardwood

Refinishing is a labor-intensive process that involves sanding, staining, and finishing the hardwood floor. Vacuuming between each step is essential to maintain a dust-free surface. Contact Hardwood Floor Refinishing NJ for professional help. 

Hardwood floors are renowned for their durability, and they can indeed last a lifetime if properly installed, maintained and refinished. Unfortunately, like any floor, they do wear down over time and refinishing is necessary to bring back their original beauty. Refinishing involves sanding down the hardwood floors and applying a new finish to the wood. This is a much more intensive process than resurfacing and requires the use of special equipment. Refinishing can also cost more than resurfacing, but it often adds greater value to the home and is worth the investment.

Before refinishing, the room must be thoroughly cleaned and all furniture removed. Vents and doors must be sealed to prevent dust from escaping. The existing finish must be sanded down to the bare wood, using several passes with different grits of sandpaper. Then, a new stain can be applied to the bare wood or the existing color can be preserved. There are also products that can be used to refresh a hardwood floor without refinishing, such as Rejuvenate Wood Floor Restorer, which is available in satin and glossy finishes.

Once the bare wood is dry, it must be vacuumed and dusted with a tack rag to remove any dust or debris that may have accumulated. Then, a new water-based polyurethane can be applied in three coats (via Pro Floor Tips). Some finishers offer lower estimates by applying only two coats, but this will likely result in a surface that is less durable and may allow scratches to penetrate the surface more easily.

A few final steps should be taken to ensure a smooth finish, including screening the floor to remove any remaining sanding marks. This can be done with a lamb’s-wool applicator on open floors, or by using a china-bristle brush for edges and corners and a synthetic-wool application pad on trim and borders. It is important to work with the grain of the flooring, angling the applicator slightly as you move along the floor.

Refinishing can be a challenging project, and the most successful results will always come from working with a professional. A Bona Certified Craftsman is fully trained on the full line of Bona products from dust-free sanding to finishing and can help you decide what style and color of finish will best suit your hardwood floors.

Preparation

Hardwood floors are a beautiful addition to any home, but they aren’t impervious to damage. Fortunately, hardwood floor refinishing offers an excellent way to give them a new lease on life, restoring their beauty and durability and adding years to their lifespan.

Refinishing is the process of sanding down the existing hardwood floor and then applying a new coat of finish. The first step is to clear the room of furniture, rugs and other items that will get in the way of the sanding process. You should also install vent covers and quarter-round trim, as these can help prevent the sanding dust from escaping into your house.

Before starting the sanding process, make sure you have a large drum sander and plenty of safety gear. Depending on the condition of your wood flooring, you may also want to use a chemical stripper. This step is optional, but it can remove old finish and bring up fresh timber for refinishing.

Once the sanding is complete, you should clean the boards thoroughly with a broom, vacuum and dust mop. This will help ensure that all the dust and dirt is removed before you apply the final coat of finish. After cleaning, allow the floor to dry completely before reintroducing furniture or area rugs.

The most common topcoat for hardwood is polyurethane, which creates a clear, plastic-like surface that protects the hardwood and makes it resistant to moisture and everyday wear. It is available in a variety of sheens, from matte to high-gloss. Polyurethane is easy to apply with a standard paintbrush and can be purchased in water-based or oil-based formulas. Water-based poly dries quickly, but can show every mistake in application, while oil-based poly dries slowly but produces a very smooth, elegant finish.

Refinishing is a costly process, but it typically results in a more durable hardwood finish than resurfacing. In addition, refinishing is the best way to address major scratches or gouges that can’t be resolved by regular cleaning and polishing. However, if your floors are beyond repair due to extreme wear or moisture, it’s probably time to replace them.

Staining

Staining is the most noticeable element of refinishing hardwood floors. When done well, it can create a beautiful look for your home. Staining requires careful preparation to ensure that the stain is applied evenly and will adhere to the surface. Staining can also be a labor-intensive process, especially if the floor has been previously stained or finished and needs to be sanded before staining again. If you are unsure that your DIY skills can handle this task, it is best to hire a professional hardwood floor refinisher.

Before beginning the staining process, it is important to determine which wood species your floor is made of and what color you want it to be. Different types of wood respond differently to stains. It is important to test the color in an inconspicuous area of the room and wait for it to dry before applying it to the entire floor.

During this process, it is important to sweep and vacuum the floor regularly to prevent any dust particles from being trapped in the newly-sanded and stained boards. If you have a power sander, there is usually a vacuum attachment that will help eliminate the majority of the dust generated during this process.

Once the sanding is complete and the floor has been thoroughly vacuumed, it is time to start the staining process. It is important to note that this is a very messy job and you should be prepared for this. Be sure to wear old clothes and protective equipment (like a respirator mask) when working with the stain and any sanding equipment.

It is important to remember that it may take several hours for the stain to completely cure on the hardwood flooring. This is why it is important to have all the furniture moved out of the room in advance of starting the refinishing process. Once the stain has dried, it is time to apply the polyurethane sealer.

This step is important in protecting your new finish and will help to maintain the beauty of your hardwood floors for many years to come. Depending on the type of polyurethane sealer, it may be necessary to sand the floor again between coats.

Finishing

Once you have sanded the floor down to its bare wood and removed the dust, it’s time to apply the new finish. Choose your preferred option, such as a water- or oil-based polyurethane. Water-based finishes dry quickly, while oils take a bit longer but provide superior durability and protection.

It’s a good idea to choose a low-VOC or no-VOC finish, as this will reduce indoor air pollutants and help with the ventilation in your home. It’s also recommended that you allow each coat to dry completely before applying the next. Vacuuming between steps is also advisable.

Staining is another common option for refinishing hardwood floors, and it is particularly useful when refinishing old or damaged floors. A penetrating wood stain soaks into the bare wood, transforming the color and adding a fresh look to your hardwood flooring. Stains come in a variety of shades and tones, allowing you to match your hardwood refinishing project with your specific interior design style.

When the stain has had a chance to dry, the refinisher will apply the first coat of polyurethane. Depending on the brand of finish used, a minimum of three coats may be necessary. It’s important to read the manufacturer’s instructions and follow their directions carefully. The refinisher will then sand or buff the surface between each coat of finish, eliminating any imperfections in the hardwood flooring.

While refinishing is not a difficult task, it’s not something that most homeowners will want to do on their own. Hiring a professional refinisher will ensure that the job is done correctly and that the results are stunning. It’s generally a good idea to schedule refinishing every couple years, but the exact frequency will depend on the amount of traffic and other factors.

Refinishing your hardwood floors is a great way to protect and enhance your investment, saving you money on costly replacements in the future. A good quality refinishing job will extend the life of your hardwood floors, keeping them looking beautiful and fresh for years to come. It’s well worth the effort, especially if you have children or pets.

Making A Furniture
Uncategorized

Steps In Making A Furniture

Furniture is a complex design, blending functionality and art. Learn how to design and build wood furniture in a timeless style in this course from expert carpenter Israel Martin.

The first step in the furniture production process is the concept development stage. Furniture designers create sketches and 3D models that outline the furniture’s shape, size, materials, and functionality.

Design

Furniture is a basic part of any home, but it’s also often a complex and beautiful piece of design. Some furniture designers create designs that are mass-produced by large manufacturers, while others work with individuals to make custom pieces for their homes or businesses. Whatever the case, a successful furniture design must serve several purposes, including being versatile, functional, and comfortable.

A good starting point for a new piece of furniture is a basic concept, which can be sketched on paper or created using modern computer software programs. From here, the furniture designer must determine what materials will be used to create the piece and if any additional features need to be included. For example, if the designer is designing a chair, they may need to consider how much support the chair should have as well as whether or not it should be covered with fabric.

During this process, it’s important to keep up with current trends in the furniture industry. This can be done by reading up on new styles or visiting museums to see the latest collections. It’s also a good idea to follow furniture design blogs and subscribe to industry magazines.

Finally, it’s a good idea to experiment with different types of raw materials. Some of the most popular materials include wood, metal, and plastics. By experimenting with these and other options, a furniture designer can discover what works best and inspire new designs. For example, mixing a traditional material like wood with an unexpected material like leather helped to revolutionize the Bauhaus movement and led to iconic designs that are still loved today. Likewise, incorporating modern manufacturing techniques into furniture design can open up the possibility for entirely new forms of art.

Materials

When you think of giving your home a facelift, the first instinct is to repaint the walls or buy new furniture. Furniture is a great way to express your style and personality. But have you ever wondered how those beautiful pieces are made? It takes a lot of work to design and construct a piece of furniture that will last for years. Furniture is made of many different materials, including wood, metal, and plastics. Industries in the furniture manufacturing subsector use processes such as cutting, bending, molding, and laminating to make these pieces. Some establishments may specialize in making articles primarily from one material.

The primary step in making furniture is selecting the right type of wood. Heavy pieces, such as wooden tables and bed frames, require tough materials that can withstand frequent use. Hardwoods, such as mahogany and oak, are good choices for these purposes. Softwoods, such as fir and ash, can also be used for some types of furniture.

Once the wood is selected, it’s prepared for sanding and finishing. Sanding is a tedious process, but it’s essential to get the finish as smooth and durable as possible. This process also helps the wood retain its strength, preventing damage during transportation and storage.

Other secondary materials, such as glass and ivory, have also been used to add a decorative touch to furniture. These materials can be carved, engraved, or inlaid into the surface of the furniture to create a unique design. These materials can also be molded into shapes and sizes to fit the requirements of a particular piece. However, it’s important to remember that too much decoration can overpower a piece of furniture. Try to limit a piece of furniture to two or three strong elements. These can include figured wood, strong curves or angles, texture, color, pattern, contrast, or visible joinery.

Scale Model

To make a scale model, you’ll need basic math skills and a few essential materials. Graph paper is important, as is a ruler and a pencil (preferably one with a sharp tip). You may also want a piece of scratch paper, a calculator (not shown) and an envelope to store your flat scale furniture cutouts. A manila envelope works best for this purpose. Without an envelope, your scale furniture cutouts will probably get lost, ripped or crushed.

Before you start building your scale model, you’ll need to decide on a scale. This will determine how many times smaller your models will be than the originals. For example, if you want to build a scale model of an apartment building, your scale will be eight feet high, one foot wide and two feet long. You can then divide these measurements by 100 to get the size you need for your model.

If you’re unsure about which scale to use, choose a common one like 1:48. This will give you enough room to move around your model and still allow you to keep it easily portable. Alternatively, you can opt for a more complicated scale such as 1:6.

Once you’ve determined the scale of your model, measure your space and sketch out any built-in features. You’ll then need to add representations of doors, openings, windows and other “permanent fixtures” to your scale drawing. You can also measure the distance from your walls to any fixed items, such as light switches and electrical outlets, so you’ll know where to place them when arranging your new furniture. To ensure that your measurement is accurate, make sure to use a tape measure.

Prototype

A prototype is an early version of a piece of furniture or a design. It can be full size or a scale model, but it must adequately represent the finished product. For example, a prototype of a chair could be made from cardboard or wood, but it must show how the joints would work and whether it will look good in person. Prototypes also allow designers and engineers to examine the design for flaws, problems or potential alternatives to the final product.

The word “prototype” can also refer to a type or standard, especially in human culture. For instance, the mythical hero Robin Hood is often seen as the prototypical kind and honorable outlaw, while Vincent Van Goh is often considered the prototypical tortured artist who died unappreciated by his peers.

A software application like Wondershare Mockitt can help you create a prototype of your project. It has several high-quality templates that can be used to create low, medium or high fidelity prototypes. You can even choose the environment and perspective that you want to use in your prototype. Once the prototype is created, you can review it with clients or end-users for feedback and make necessary changes. This process can be repeated as many times as needed to achieve the desired results.

Production

When people think of home improvement, they often think of a new coat of paint or some shiny new furniture. But they may not realize that furniture production is a complex process that involves a number of steps. From designing the piece to putting it together, furniture making requires careful planning and attention to detail. Taking the time to understand the furniture production process can help people make better choices when buying furniture for their homes.

The first step in the furniture-making process is to produce working drawings. This is typically done by a draftsman in a firm of any size. He works out practical details, sometimes in consultation with the designer who advises on proportions and decorative details. In a smaller firm the designer may do the work himself, but in larger firms it is more common for him to have someone else prepare the full-size drawings.

Working drawing will also be used to make a bill of materials and a production schedule. These documents will give the manufacturer an accurate idea of how much material and labor is required to make a given piece of furniture. This information will also be useful in calculating the cost of making the furniture and determining whether the project is financially viable.

Most furniture is made of wood. However, metal and plastics are also frequently used in furniture manufacturing. Some furniture establishments specialize in making articles primarily of one material, such as metal or wooden tables and chairs. Others, such as wood trusses or upholstered furniture, combine components of different materials.

Once the drawings are ready, the next stage is to cut, shape and assemble the furniture. Some furniture is made as flat packs for customer assembly at home. In such cases, operatives will use hand or power tools to assemble the pieces. They will also add items such as screws, glue and handles. The finished product will then be cleaned and sealed. The furniture is then moved to a packing area where it will be wrapped and boxed for shipment to customers.